Note: This is the second of a two part series on the care of DSLR image sensors. To better understand the subject, please start with Sensing Your DSLR Sensor's Condition.
There is no doubt that my camera's sensor requires cleaning. Figure 1 shows the dust spots that were detected from the test procedure discussed in my previous post. I am not proud of my "dust collection", and the images it produces reflect its poor state of cleanliness.
Then what are the options for cleaning the surface of my image sensor?
1. My first and safest recommendation is to allow the manufacturer or a professional camera repair company tackle the tricky task. I asked one of the country's best repair organizations, Advance Camera of Portland, Oregon for a description and pricing for their sensor cleaning service.
The price for this service on a standard DSLR is $40. This includes cleaning the sensor's surface of dust, general camera cleaning and updating any firmware required to make the camera current. Companies like Advance Camera have trained staff technicians who perform this service daily and are well equipped to return the sensor to its original factory condition.
With this option, the risk of damage is placed on the company performing the service -- not you. If anything goes wrong, you are protected.
WARNING: The following options carry a heavy risk for the camera owner. In some cases, actions you may take to clean your sensor could void your camera's warranty or result in a much more expensive repair. Performing either of the following actions is done solely at the camera owner's risk.
Pretty heavy-duty warning. But we must be realistic and understand the potential for seriously damaging the sensor and/or the camera when any "do-it-yourself" method is attempted.
2. Use a "blower bulb" to blow off the dust.
Figure 2 -- Canon Blower Bulb
A blower bulb, like the one shown in Figure 2, is the second safest way of cleaning your camera's sensor. DO NOT use cans of compressed air. This product's propellant may actually "freeze" your sensor.
Getting to the camera's imaging sensor is not as easy as taking off the lens. Immediately behind the camera lens is the mirror (shown in Figure 2) that reflects the lens image into the viewfinder housing. Behind the mirror are the curtains that make up the camera's shutter.
The sensor is behind the shutter. To lift the mirror and open the shutter curtains, DSLR camera manufacturers have included a special function on their cameras called "sensor cleaning". Look up "sensor cleaning" in your camera's manual to find out how to access this function on your camera.

Figure 4 -- The camera's sensor exposed when the "sensor cleaning" function is activated.
Ignore the temptation to touch the sensor.
Activating the "sensor cleaning" function will raise the mirror and open the shutter to expose the image sensor (see Figure 4).
Note: The sensor is covered with a glass filter. It is this glass filter that dust calls home -- not on the sensor itself. You will be cleaning this glass filter. Never touch this surface. You will transfer your skin oils and could scratch the glass surface.
In this position, the blower bulb can be used to blow off the surface of the sensor. DO NOT touch the sensor glass with the blower tip. Only the air from the bulb should touch the sensor.
That's it. Reset your camera's "sensor cleaning" function to normal, replace the lens and start shooting.
So, what's the catch? There are three potential problems with this cleaning approach:
- dust that is "stuck" to the sensor's glass surface will probably not be blown away. Only loose dust will be removed.
- using a bulb blower can actually add more dust to your sensor's surface. Dust that is located within the housing may be dislodged and fall on the surface of the sensor.
- there is a remote chance that if you accidentally strike the surface of the sensor glass with the tip of the bulb and scratch the glass. In that extreme case, the camera must be sent in for an expensive repair.
3. Do-It-Yourself Sensor Cleaning Kit options.
Wouldn't you know it? As soon as DSLRs appeared on the market, some enterprising inventor began selling "do-it-yourself" kits for cleaning sensors. Knowing that my camera needed more than a simple "blowing off", I went to Pro Photo Supply in Portland, Oregon to find out which current products were the best value and safest to use.
I was shown Pro Photo's best selling and most cost effective sensor cleaning products -- both manufactured by Dust-Aid.

Figure 5 - Dust-Aid Platinum, Dry sensor cleaner
The Dust-Aid dry sensor cleaning uses no fluids to clean the sensor. Instead, the rubber stamp-like device uses a special cleaning silicon pad to trap the dust and remove it from the sensor's glass surface. The silicon pad is lightly touched to the surface of the sensor where it captures dust and is lifted with the pad. The system comes with cleaning strips that allow the silicon pad to be cleaned and reused indefinitely.
The process begins just like the bulb blower method. First activate the camera's sensor cleaning function. As shown in Figure 6 above, the pad is placed in contact with the sensor in each of its four corners. This placement allows enough overlap to clean the entire sensor glass surface. This device easily removes any dust that isn't "welded" onto the sensor surface. In many cases, this cleaning device and process may be all that's needed.
For the tougher jobs, like my D30, the wet sensor cleaner is the most appropriate "do-it-yourself" option.
For the tougher jobs, like my D30, the wet sensor cleaner is the most appropriate "do-it-yourself" option.

Figure 7 - Dust-Wand Kit, Wet sensor cleaning
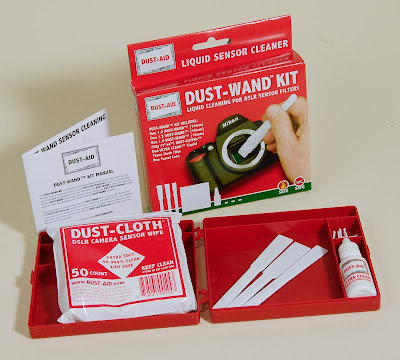
Using the Dust-Wand Kit (shown in Figure 7) is more complicated, but does a very thorough job. The kit comes with three soft plastic wands. The reason for three wands is to accommodate the three current DSLR sensor sizes. The wand is covered with a super soft swab that attaches to the wand. A special non-alcohol, non-flammable and fast drying liquid cleaner is then applied to the cloth-covered wand to clean the sensor's filter glass.
Here's how the process works.
The kit comes with detailed directions and diagrams for attaching the cleaning pad fabric to the plastic wand. Figure 8 shows my attempt at creating the "perfect" cleaning wand.
- Once the fabric is folded around the wand, a supplied plastic clip (red circle) holds it in place. The object is to make the top edge of the wand as flat and smooth as possible. It's this edge that will be in direct contact with the filter glass that covers the sensor.
- Now it's time to activate the "clean sensor" function on your camera to move the mirror and shutter out of the way.
- Apply 3 to 5 drops of cleaning fluid (number of drops is determined by which size wand you are using) to each side of the wrapped wand.
- Place the wand in the lower corner of the sensor filter (yes, touching the filter) and gently move the wand across the sensor filter -- ONCE (see Figure 8).
- Remove the wand from the camera and discard the wrapped cloth.
- Wrap a new cleaning cloth onto the wand (using a new cleaning cloth ensures that no dust will be brought back to the sensor when the second cleaning pass is made).
- Add 3 to 5 drops of cleaning fluid.
- Place the wand in the upper corner of the sensor filter and gently move the wand across the glass -- ONCE. The overlap between the two cleanings will ensure complete sensor coverage.
- Return your camera to normal shooting mode and attach lens.
It did work. Compare Figure 1 to Figure 10. It was a tense process, but my sensor hasn't been this clean in several years. The camera's like new and back in action again.
The cost for the Dust-Aid Platinum dry cleaning device is $29.99. The price of the more aggressive Dust-Wand wet kit is $39.99. This is about half the cost of other "do-it-yourself" products I've seen on the market. Considering it has been five years since my sensor was last cleaned, I calculate the 50 cleaning cloths that come with the Dust-Wand Kit will last me about 25 years. Kidding aside, there are ample supplies in these kits to last the average user several years.
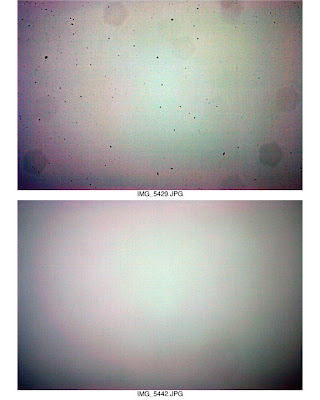
I thought you might also enjoy seeing two worst-case, before and after examples of sensor cleaning that Advance Camera provided from their own archives. They are shown below as Figures 11 and 12.
Figure 11 - Before (top) and after (bottom) cleaning examples

Figure 12 - Before (top) and after (bottom) cleaning examples

Figure 12 - Before (top) and after (bottom) cleaning examples
One final example from Advance Camera is shown in Figure 13. In this case, the top image is the results of a customer attempt to clean his sensor. The bottom photo is the result after professional cleaning was performed on the sensor.

Figure 13 - Top image shows the streaked results of a "do-it-yourself" sensor cleaning
while the bottom picture shows the sensor after it was professionally cleaned.
I have also seen some suggestions that a vacuum brush is a sensor cleaning option -- like the ones that are sold to clean computer keyboards. I do own one, but I find that the brush bristles are very stiff. As a result, I worry about scratching the sensor's filter glass and haven't attempted this solution.
Of course, keeping your sensor as clean as possible to reduce the number of sensor cleanings should be the real objective. Here are a couple of tips to prevent dust from making a home on your sensor.
1. Always cover the mirror, shutter, sensor cavity of your camera. Usually a lens is attached to solve this problem. But when you don't have a lens attached to your DSLR, by all means, use the body cap that came with the camera. See Figure 14.
2. When changing lenses, face the body of the camera downward to prevent dust from falling into the mirror, shutter and sensor cavity. Dust doesn't usually fall up. See Figure 15.
Neither of these tips adds any time or cost to your photography, but they will help prevent dust from reaching the surface of your sensor.
One last warning: Sensor cleaning options 2 and 3 present risks that could damage your camera. With the initial investment of "doing it yourself" and having a professional perform the sensor cleaning being about the same consider which is most appropriate for your situation, skills and nerves. The cost of replacing a scratched sensor filter glass ranges from approximately $250 to $800 depending on which DSLR you own.


No comments:
Post a Comment